
|
Return to Main Menu |
|
A major step this, and potentially the most tricky stage: certainly the most demanding in
terms of artistic skill. You should now have a pair of hooves that you can fit your hands
into, but somewhat knobbly and ill-formed. Now you must add a second layer of modelling
putty, shape it and smooth it until your hooves are recognisable as a horse's. This is
another two-day job. Start with the soles, then do the walls. The Sole The hoof is the result of several million years of evolution: horses started off with paws. The need to be fast runners resulted in the paw extending, and all the weight came to be born on just one finger: the others, unneeded, were lost. As a protection against all the punishment this remaining digit was expected to take, the nail expanded, thickened and eventually became the hoof we know today: In essence a horse has a single-fingered 'hand' with a greatly expanded nail that surrounds the end of the digit. Bearing this in mind may be helpful at this stage. Imagine one of your own nails extending about three quarters of the way around your finger-tip instead of merely covering the top surface. 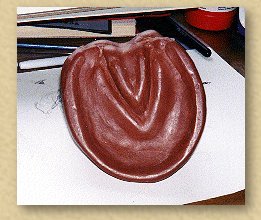 Fig 10. If you look at the sole of a hoof, you will see the characteristic rounded 'U' shape which is actually formed by the rim of the 'nail'. This curls in at the heel to form a couple of rounded lobes. The hoof wall constantly grows as our own finger-nails do, so it is this rim that actually makes contact with the ground. The sole of the foot is concave. The 'V' shaped prominence in the middle is called the frog. There tend to be deep channels either side of it which is where stones and other debris tend to get lodged and cause a nuisance of themselves. The frog, though it projects from the sole, should not touch the ground in a real hoof: All the horse's weight is bourne on the rim. However, for the sake of this project, you may wish to distribute the weight more evenly and make it the same height as the rim. It depends whether you intend to walk on it! To mould the sole, I started out by rolling a long sausage of putty, about as thick as my little finger, and as long as the hoof rim. Imagine you are making a horseshoe - in essence, you are! Once you have the required length and thickness, wet your thumbs and fingers and press the 'shoe' to the rim of the sole: it should adhere quite nicely. Use firm pressure and smooth the inner edge down against the sole. All the time, view the overall shape and make sure it retains a healthy hoof outline. Don't try to prevent the rim spreading over the edge: you actually want some overlap (see Fig 11). You'll need to ensure that the rim is actually flat: take a plastic bag and spread it flat on your worktop. Wet the hoof sole thoroughly to prevent it sticking, then place it firmly sole-down on the plastic. Don't exert too much weight: just enough to squash the rim into a uniform height. Remove from the plastic, and use a wet thumb to smooth off any unnaturally 'sharp' edges this may have created. Now for the frog: make another sausage, long enough to stretch in a straight line from heel to toe of the hoof. Bend it in half to make a V and press it in place. Again, smooth it out with wetted fingers and thumbs. Try the hoof sole-down again to make sure the frog doesn't project more than the rim. Don't worry if it does: just keep smoothing it down, testing it, and smoothing down again. That is really all there is to making the sole. Whilst making the prototype, I often found that in smoothing things down, I flattened the rim and the frog too much. This is no problem: just mould another sausage and repeat the stage above on top of the first attempts. Do this for both hooves, and while you're at it: make sure they are approximately the same size! Place them side by side. Do they look right? Okay, then allow them to dry before continuing. 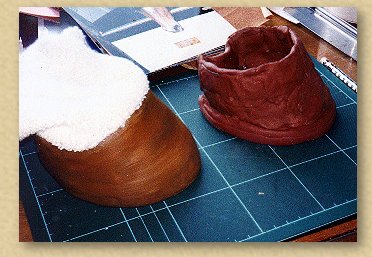 Fig 11. Right way up, your hooves should now look something like the one on the right in Fig 11. Note the way the finished sole has overlapped the existing rim and forms a 'bumper'. The next layer should end up flush with the overlap to produce the shape of the finished hoof on the left. This final moulding stage is to hide the knobbly underlayer. The process is technically simple: simply add a layer of putty over the entire surface and smooth it with your thumb and fingers. Sounds simple doesn't it? In practice, it's trickier than it looks, but not too difficult. Be patient. Refer to reference pictures as often as possible. Keep looking at the hooves from different angles and comparing them to each other. Don't neglect the heel! If you're feeling adventurous when you think the basic shape is right, try adding "growth rings": hooves have a grain running parallel to the coronet. These should not be too prominent: firmly rubbing a sponge around the wall of the hoof achieves this effectively, but as I say, this is for perfectionists and not really necessary. The Flange Having let these dry, you are almost home, but there is a final, critical piece of construction outstanding. If you put your right hoof on over your fist now, it should be a comfortable fit, but there's nothing to hold onto. See how easy it is to pull off with your left hand. If you flex your right hand, the hoof will probably fall off. You need something to hold onto. 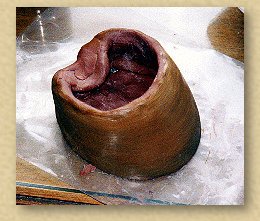 Fig 12. Looking at Fig 12, you will see I have added a sort of 'flange' over the heel. This is hollow underneath. When you place your fingers in the hoof, the tips curl underneath this, while your tucked thumb rests on top. You will find this is enough purchase to make the hoof completely secure. To make it, simply take a nice chunky knob of putty, and attach it to the inside-top of the heel. Wet your hand to stop it sticking and place it in position in the hoof, then shape the flange roughly so it provides a suitable handle. Obviously it won't take any force whilst wet, but make sure it is comfortable, and that you can still get your fingers in and out. Smooth the base of the flange into the surrounding walls and make sure it adheres well to the rest of the hoof. |

|
Back |
|
Next |