
|
Return to Main Menu |
|
The Golden Rule
This is the point at which we begin actual construction, beginning with the wire armature. Since this defines the general structure of the hoof, it is this stage at which the biggest difference will manifest if you aren't building an equine hoof. However, the principles still hold true. I strongly advise making both hooves at once, otherwise it is very difficult to get them the same size. One other thing is worth emphasizing: As your hooves develop they will change in thickness, shape, etc. Maybe not very much, but you may be surprised at how much of a difference this can make when you come to try the things on. So do this constantly, making sure your clenched fingers can easily pass in and out through the top (the 'corronet'). Consider: what happens to your thumb? Can you easily tuck it out of sight against your fingers, or is it left outside? If you address this matter constantly, you won't be caught out, and corrections can be made before an alteration becomes permanent. 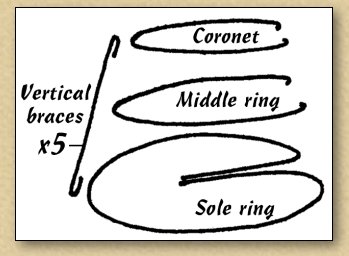 Fig 4. Initial Construction For equine feet, each hoof consists of eight pieces of wire: three horseshoe shaped rings, and five upright braces that will seperate them and secure them. I found it convenient to first make the sole and coronet rings: these pretty much define the shape of the hoof so if you get these right, you're off to a good start. You will note from your observations that hooves are narrower at the top than at the bottom, so start with the coronet ring, as this is where your fist will enter. Cut yourself a length of wire approximately 20cm (8 inches) long, and bend it using fingers or pliers into a rough horseshoe shape. Don't worry if the wire is too long at the moment: there will almost certainly be alterations to make. Your fist needs to be able to pass through this ring with no less than about half a centimetre (1/4inch) to spare at the widest point. Tighten or loosen the loop as necessary. You will probably have to do this a number of times: Altering the size often alters the shape and vice-versa, so keep trying it for size, and when you correct the size, try it for shape. Now make the sole ring using the coronet as a guide - be careful not to bend the coronet again now that you've got it right!. The sole ring will be the same shape but larger - start with a length of wire about twice as long as before. Your observations will show you how much larger. When I constructed the prototypes, I increased the diameter by about 2cm (3/4 inches). Also, because the sole will actually form the base of the hoof, bend the excess wire inside to form the 'frog' (see Fig 5). Do this for both hooves. Now check again, and make sure they both fit, and are a pleasing shape. They may not be identical, but they should be similar. Satisfied? Then you can clip the excess wire from the coronet and sole rings. Leave the back or heel of the coronet open as shown.
Now you need to make some of the vertical braces. This is the part where you begin to wish you had more hands (I ought to add some terrible joke here about wishing to be sixteen hands and palomino too, but that would be too predictable).
Take the rings for one hoof, and hold them apart as if they were in their final positions. They shouldn't be parallel: the height of the heel is less than the
height at the toe, so the coronet will be pitched back slightly (refer back to Fig 1). If you have a suitable modelling clamp, lock them in this position. To begin with we'll just make three braces: the
front-center brace and the two 'heels'. You're aiming for something like Figure 5. 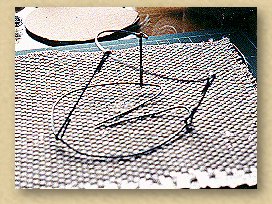 Fig 5. I made the heels almost vertical. The front-center brace was about twice as long. I cut the wire deliberately longer and bent the ends over as you can see in the photo. This makes things a lot easier when you're trying to secure things in position for soldering. You are now ready for the first bit of soldering. Get everything you will need together, and ensure you have a nice clear workspace. Do a dry run first, and make sure things are the right shape. Solder won't adhere well to greasy or dirty wire, so use a bit of emery cloth or sandpaper and give a quick rub to the areas you will be soldering - and then keep your fingers off those parts! You might find small pieces of sticky tape help things to behave while you try to position them, but don't wrap tape around the joint you are trying to solder - not only will it get in the way, it will melt. Put all three braces in position before soldering even one, as this will ensure the overall shape is right. Now add solder. This is when you will discover how invaluable a poseable modelling clamp can be! Allow your soldering iron to reach the right temperature, then hold it against the join to be soldered. Taking a length of solder, feed it against the heated head so that it melts around the joint. If the wire is dirty, the solder will bead up like mercury and drip off: if this is the case, remove the iron, and get that emery cloth out again! All being well however, the solder will stick nicely: apply it generously: this will all be hidden by the modelling putty, and we want a good strong join. Do this for all six joins (one for each end of the three braces). If you make a mistake, simply heat the faulty join until the solder runs, then reposition. All being well, you should have two somethings like Fig 5 in front of you. Let them cool for a minute, then (being careful of sharp outcrops of solder) try them for size again. With your hands in fist-shape, you should already be able to see a surprising illusion of "hoofness". With this frame as a starting point, you should find it easier to add the remaining two braces (as shown below in Fig 6). I started by adding the fourth and fifth braces: you don't need a ruler for this. Simply measure the wire up against the existing framework, cut to length allowing excess to bend the ends over. If you're careful, these braces will even hold themselves in place ready for you to solder. If not, use a clamp again. The final component for this stage is the middle ring, which adds a little more structural strength and offers another strut on which to add modelling putty. Make another horseshoe shape and hold it so that it occupies the position exactly half way between the sole ring and the coronet. Now you need to bend this to shape so that it fits snugly against all five braces! Take your time, and do it little by little. When you have it right, solder as before, at all five braces. All being well, you should now have two of these: 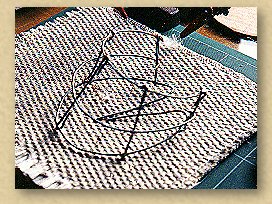 Fig 6. Right, guess what you do now? Yep: TRY THEM ON AGAIN! Because if you aren't happy with them at this stage, no amount of careful modelling will correct them. If you're unhappy about anything, see to it now, even if it's so drastic it requires complete rebuilding - the raw material thus far has been relatively cheap. |

|
Back |
|
Next |